JINIers
[PCK] Building a DevOps Pipeline lab 본문
Building a DevOps Pipeline lab
DevOps 파이프라인 빌드
※ 수정
220621
220921
[개요]
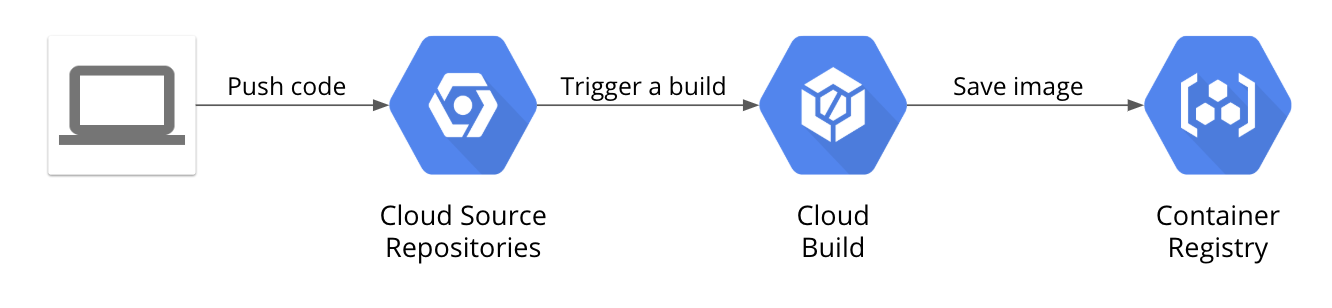
cloud sorce repositories, cloud build, build trigger 및 container registry를 사용하여 지속적 통합 파이프라인을 빌드한다.
[목표]
- git 저장소 만들기
- 간단한 python 애플리케이션 만들기
- cloud shell에서 웹 어플리케이션 테스트
- docker 빌드 정의
- cloud build 및 container registry로 docker 이미지 관리
- 트리거를 사용하여 빌드 자동화
- 빌드 변경사항 테스트
[체크포인트]
- create a git repository
- manage docker images with cloud build and container registry
- automate builds with trigger
- test your build changes
작업 1. git 리포지토리 생성
git repository는 소스코드를 저장하는데 사용됨
마지막에 코드가 푸시될 때 지속적 통합 파이프라인을 시작하는 빌드 트리거를 만든다.
source repositories > add repository > create new repository > 적어 > create
name : devops-repo
project : 현재 프로젝트 ID
cloud shell >
gcp-course 디렉토리 생성
mkdir gcp-course
폴더 이동
cd gcp-course
빈 저장소 복제
gcloud source repos clone devops-repo* 빈 저장소를 복제했다는 경고가 뜬다! 걍 무시 ㄱㄱ
저장소 이동
cd devops-repo작업 2. 간단한 Python 애플리케이션 만들기
open editor > new windows > gcp-course > devops-repo > new file > 'main.py' 생성 > 붙여넣기 ↓ > save
* 귀찮으면 그냥 vi와 mkdir로 만들도록하자..
- main.py 내용
from flask import Flask, render_template, request
app = Flask(__name__)
@app.route("/")
def main():
    model = {"title": "Hello DevOps Fans."}
    return render_template('index.html', model=model)
if __name__ == "__main__":
    app.run(host='0.0.0.0', port=8080, debug=True, threaded=True)
devops-repo 폴더 > new folder > 'templates' 생성 > layout.html 생성 > 붙여넣기↓> save > index.html 생성
- layout.html 내용
<!doctype html>
<html lang="en">
<head>
    <title>{{model.title}}</title>
    <!-- Bootstrap CSS -->
    <link rel="stylesheet" href="https://stackpath.bootstrapcdn.com/bootstrap/4.4.1/css/bootstrap.min.css">
</head>
<body>
    <div class="container">
        {% block content %}{% endblock %}
        <footer></footer>
    </div>
</body>
</html>- index.html
{% extends "layout.html" %}
{% block content %}
<div class="jumbotron">
    <div class="container">
        <h1>{{model.title}}</h1>
    </div>
</div>
{% endblock %}
다시 devops-repo 폴더 > requirements.txt 생성 > 붙여넣기 ↓ > save
- requirements.txt
Flask==1.1.1
다시 shell >
로컬 git repository에 생성한 모든 파일 추가
cd ~/gcp-course/devops-repo
git add --all
식별정보 입력
* --global 을 붙이면 변경할 수 없기때문에 퀵랩이 아닌 개인 프로젝트라면 --global을 빼고 입력해도 무방함
git config --global user.email "you@example.com"
git config --global user.name "Your Name"
변경사항 로컬 커밋
git commit -a -m "Initial Commit"
git repository 업데이트 클라우드에 푸시
git push origin master
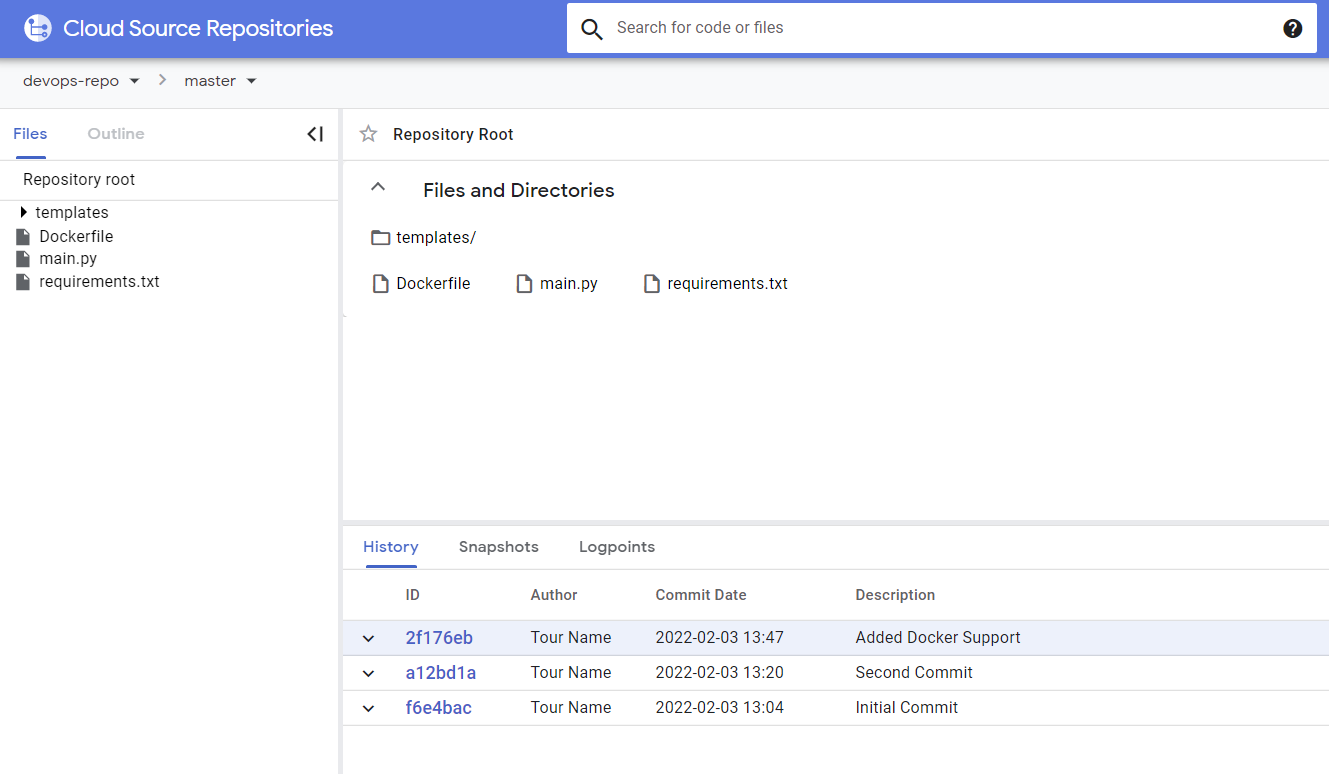
source repository 새로고침 > 방금 만든 파일이 표시된다.
작업 3. cloud shell에서 웹 애플리케이션 테스트
* 220621 기준 : 없어짐
shell >
pip 사용 flask 프레임워크 설치
cd ~/gcp-course/devops-repo
sudo pip3 install -r requirements.txt
main.py 실행
python3 main.py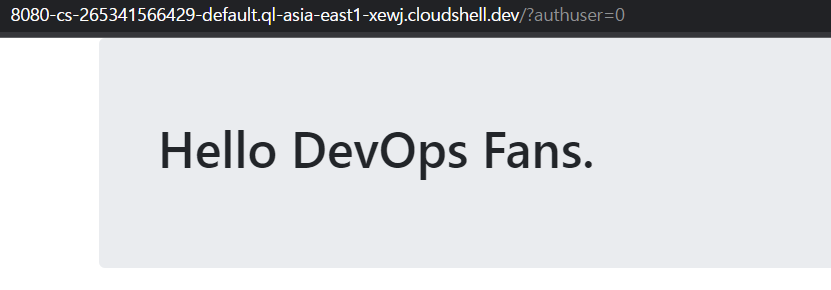
web preview > preview on port 8080 > 브라우저 생성 확인
프로그램 중지 : ctrl+C
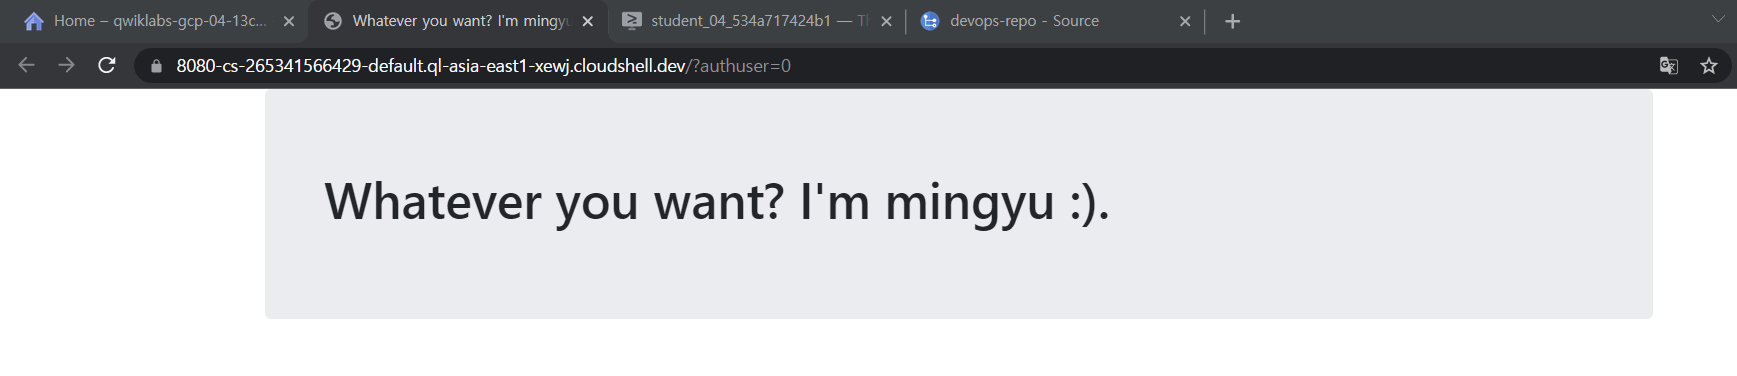
main.py 수정 > title : Whatever you want
디렉토리 이동
cd ~/gcp-course/devops-repo
변경사항 커밋(적용)
git commit -a -m "Second Commit"
변경사항 클라우드에 푸시
git push origin master
프로그램 실행
python3 main.py
다시 port 8080 브라우저를 생성 후 확인
작업 4. docker 빌드 정의
dockerfile 만들것임
코드편집기 >
devops-repo > new file > 'Dockerfile' 생성 > 붙여넣기
* dockerfile은 컨테이너 빌드 방법 정의
- Dockerfile 내용
FROM python:3.7 		#베이스 이미지
WORKDIR /app
COPY . .				# /app 폴더로 소스코드 복사
RUN pip install gunicorn
RUN pip install -r requirements.txt	#pip 사용하여 python 애플리케이션의 요구사항을 컨테이너에 설치, 'gunicorn'은 웹앱을 실행하는데 사용되는 파이선 웹서버
ENV PORT=80
CMD exec gunicorn --bind :$PORT --workers 1 --threads 8 main:app	#환경변수 입력=애플리케이션이 실행될 포트 설정
작업 5. cloud build 및 container registry로 docker 이미지 관리
위치 : /home/student_04_534a717424b1/gcp-course/devops-repo 여야 함
디렉토리 이동
cd ~/gcp-course/devops-repo
프로젝트 ID 확인
echo $DEVSHELL_PROJECT_ID
이미지 빌드
gcloud builds submit --tag gcr.io/$DEVSHELL_PROJECT_ID/devops-image:v0.1 .

yes
container registry > images > 'devops-image' 가 목록에 있어야함 > cloud build > 빌드 된 것을 확인할 수 있음
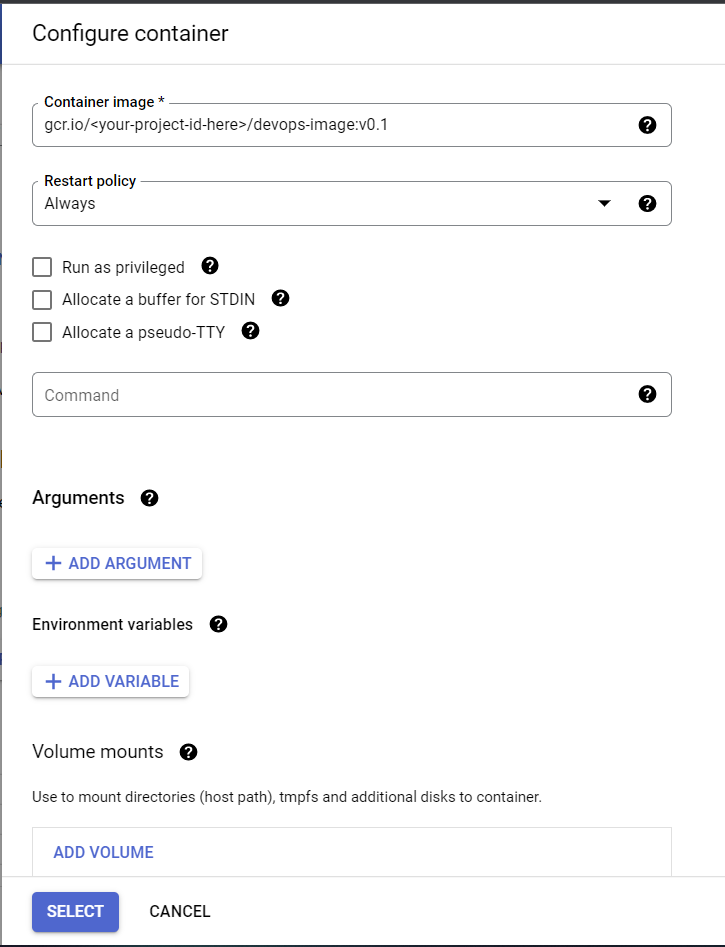
[이미지 실행]
compute engine > vm instances > create instance > deploy container > 설정 > create
변경사항 추가
cd ~/gcp-course/devops-repo
git add --all
변경사항 커밋
git commit -am "Added Docker Support"
변경사항 푸시(-> 소스 리포지터리)
git push origin master
source repositories > 변경사항 추가되었는지 확인
작업 6. 트리거로 빌드 자동화
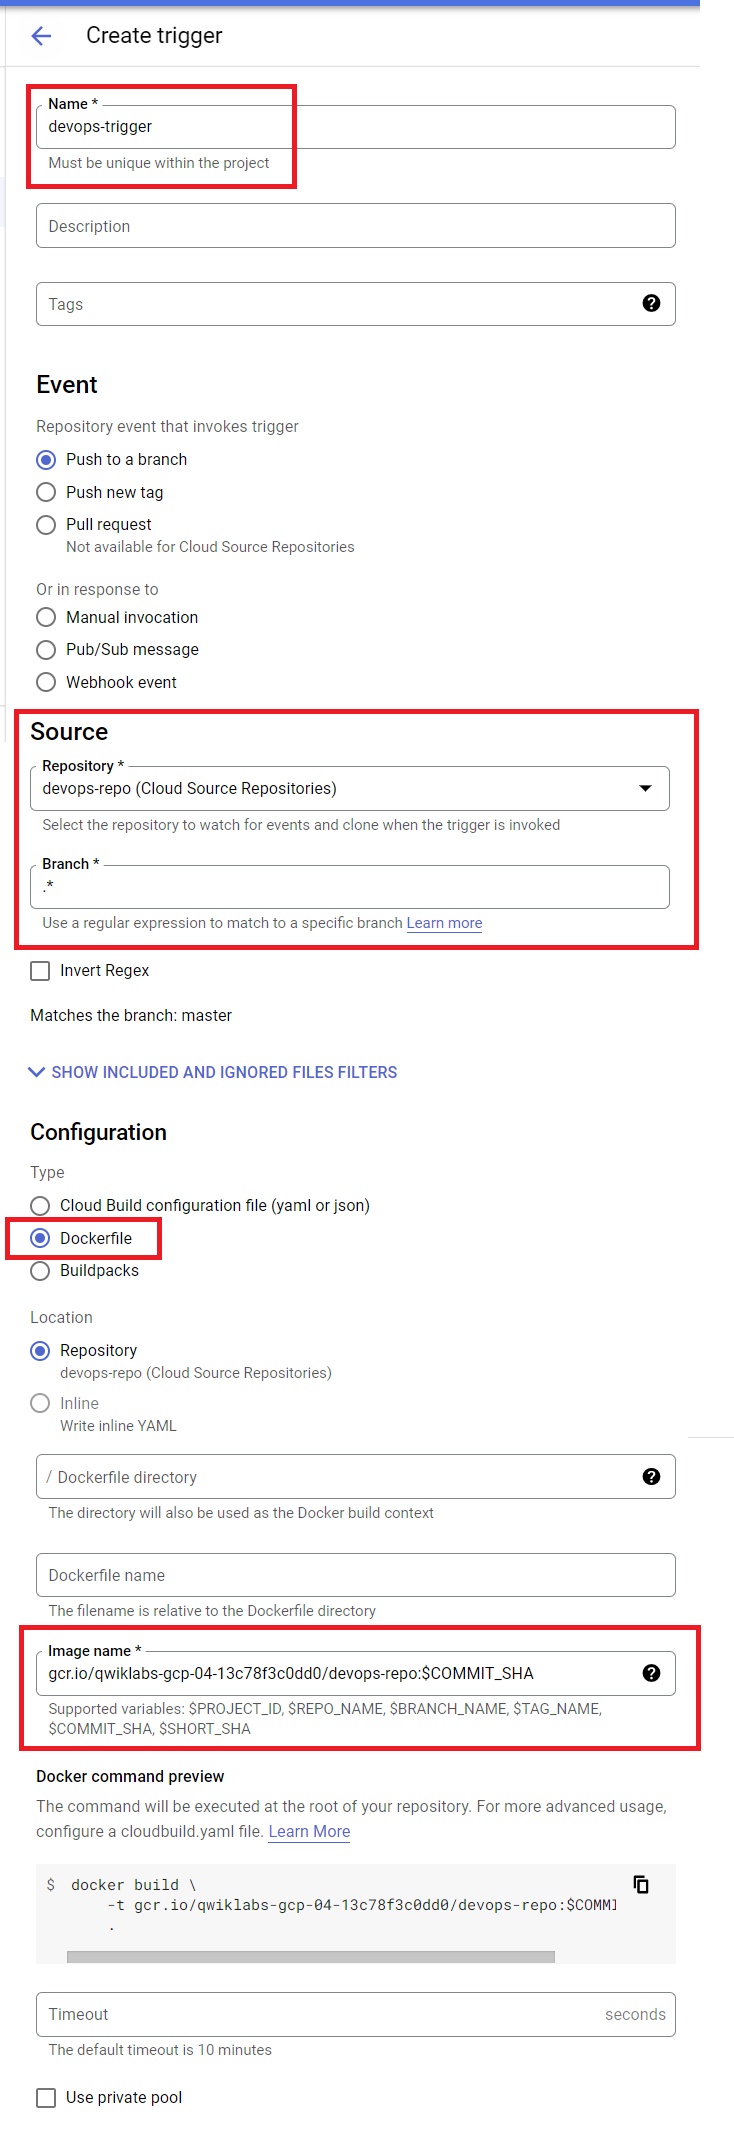
container registry > devops-image 폴더 있는지 확인 > cloud build > triggers > create trigger > 설정해 > create
[트리거 테스트]
트리거 오른쪽 run 클릭 > run trigger > history 누르면 실행중인 빌드 표시 > 클릭 > 세부정보 확인 > container registry > 'devops-repo' 라는 새폴더가 표시되어야 함
shell > 'main.py' 타이틀 변경 : hello build trigger.
cd ~/gcp-course/devops-repo
변경사항 커밋
git commit -a -m "Testing Build Trigger"
변경사항 푸시
git push origin master
main.py 실행
python3 main.py
cloud build > 실행중인 빌드가 표시되어야 함
작업 7. 빌드 변경사항 테스트
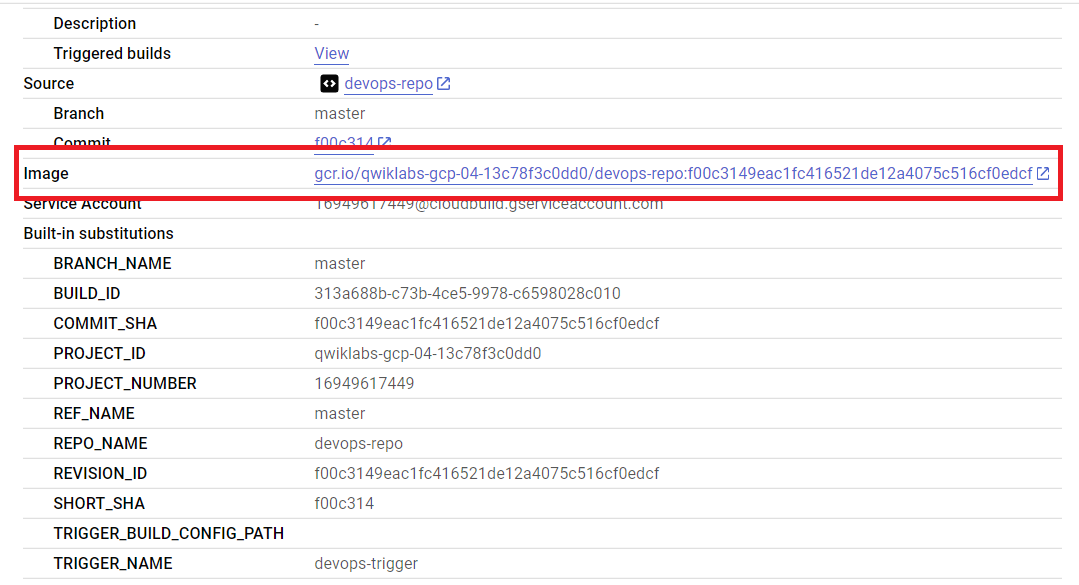
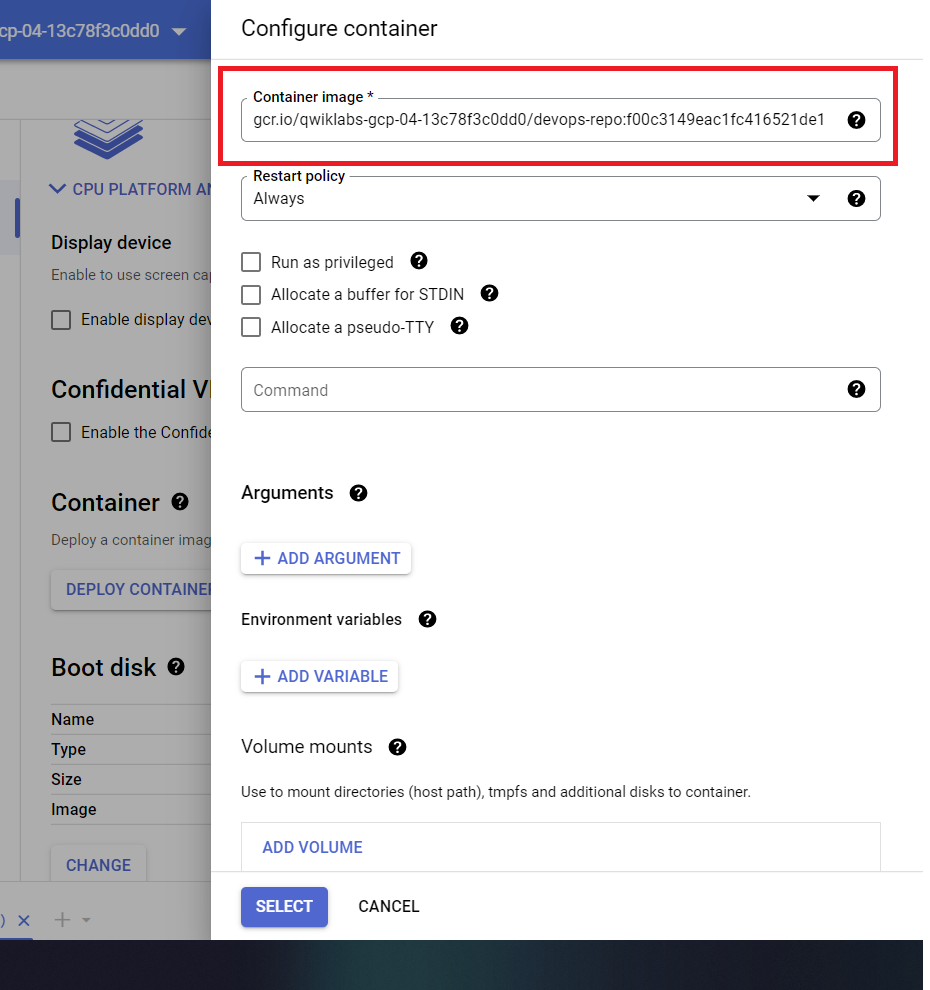
빌드 완료 > 클릭해서 세부정보 확인 > 이미지링크 복사
gcr.io/qwiklabs-gcp-04-13c78f3c0dd0/devops-repo:f00c3149eac1fc416521de12a4075c516cf0edcf
compute engine > create instance > 기본 설정 그대로 > container 부분 > deploy container > 'container image'에 이미지링크 붙여넣기 > create
'GCP > Qwiklabs' 카테고리의 다른 글
| [PCK] Continuous Delivery Pipelines with Spinnaker and Kubernetes Engine lab (0) | 2022.02.07 |
|---|---|
| [PCK] Deploying Apps to Google Cloud lab (0) | 2022.02.04 |
| [PCK] Configuring an Internal Load Balancer lab(내부 로드밸런서 구성) (0) | 2022.02.03 |
| [PCK] Orchestrating the Cloud with Kubernetes lab(쿠버네티스로 오케스트레이션) (0) | 2022.01.31 |
| [PCK] Automating the Deployment of Infrastructure Using Terraform lab (0) | 2022.01.29 |


