
JINIers
Vertex Pipelines: Qwik Start 본문
220426_Vertex Pipelines: Qwik Start
이거 좀 어려웠..
양도 많고 코드도 하나하나 보려니 어렵고 힘들고 시간이 부족 ㅠㅜ
개 요
vertex pipelines을 이용하여 ML 파이프라인 생성 및 실행
ML 파이프라인이 유용한 이유
데이터 처리, 모델 교육, 초매개변수 조정, 평가 및 모델 배포가 포함된 ML 워크플로를 구축한다고 상상해 보십시오. 이러한 각 단계는 서로 다른 종속성을 가질 수 있으며 전체 워크플로를 단일체로 취급하면 다루기 어려워질 수 있습니다. ML 프로세스를 확장하기 시작할 때 팀의 다른 사람들과 ML 워크플로를 공유하여 다른 사람들이 실행하고 코드에 기여할 수 있도록 할 수 있습니다. 신뢰할 수 있고 재현 가능한 프로세스가 없으면 이 작업이 어려워질 수 있습니다. 파이프라인을 사용하면 ML 프로세스의 각 단계가 자체 컨테이너입니다. 이를 통해 단계를 독립적으로 개발하고 재현 가능한 방식으로 각 단계의 입력 및 출력을 추적할 수 있습니다. 클라우드 환경의 다른 이벤트를 기반으로 파이프라인 실행을 예약하거나 트리거할 수도 있습니다.
목표
- kubeflow pipelines SDK를 사용하여 확장 가능한 ML 파이프라인 구축
- 텍스트 입력을 받는 3단계 인트로 파이프라인 생성 및 실행
- autoML 분류 모델을 훈련,평가,배포하는 파이프라인 생성 및 실행
- google_cloud_pipeline_components 라이브러리를 통해 제공되는 Vertex AI 서비스와 상호 작용하기 위해 사전 구축된 구성 요소 사용
- Cloud Scheduler로 파이프라인 작업 예약
1. vertex notebooks 인스턴스 생성
vertex ai > workbench > ai-notebook > open jupyter lab 클릭
2. vertex 파이프라인 설정
[1단계 : python 노트북 생성 및 라이브러리 설치]
open jupyter lab > notebook의 pyhton3 선택

1-1. 사용자 플래그 설정
USER_FLAG = "--user"
1-2. ai 플랫폼 업그레이드 및 install
!pip3 install {USER_FLAG} google-cloud-aiplatform==1.0.0 --upgrade
!pip3 install {USER_FLAG} kfp google-cloud-pipeline-components==0.1.1 --upgrade
1-3. 커널 다시시작
import os
if not os.getenv("IS_TESTING"):
    # Automatically restart kernel after installs
    import IPython
    app = IPython.Application.instance()
    app.kernel.do_shutdown(True)
1-4. 패키지 올바르게 설치했는지 확인
* KFP SDK 버전 : 1.6이라고 나와있지만 실제 해봤을 땐 1.8.* 이었다. 하지만 상관 없음
!python3 -c "import kfp; print('KFP SDK version: {}'.format(kfp.__version__))"
!python3 -c "import google_cloud_pipeline_components; print('google_cloud_pipeline_components version: {}'.format(google_cloud_pipeline_components.__version__))"
[2단계 : 프로젝트 ID 및 버킷 설정]
+로 밑에 계속 추가해서 입력한다.
2-1. 프로젝트 ID 얻는 법
import os
PROJECT_ID = ""
# Get your Google Cloud project ID from gcloud
if not os.getenv("IS_TESTING"):
    shell_output=!gcloud config list --format 'value(core.project)' 2>/dev/null
    PROJECT_ID = shell_output[0]
    print("Project ID: ", PROJECT_ID)
2-2. 버킷 이름을 저장할 변수 생성
BUCKET_NAME="gs://" + PROJECT_ID + "-bucket"[3단계 : 라이브러리 가져오기]
실습에서 사용할 라이브러리 가져오기
from typing import NamedTuple
import kfp
from kfp import dsl
from kfp.v2 import compiler
from kfp.v2.dsl import (Artifact, Dataset, Input, InputPath, Model, Output,
                        OutputPath, ClassificationMetrics, Metrics, component)
from kfp.v2.google.client import AIPlatformClient
from google.cloud import aiplatform
from google_cloud_pipeline_components import aiplatform as gcc_aip
[4단계 : 상수 정의]
PATH=%env PATH

%env PATH={PATH}:/home/jupyter/.local/bin

REGION="us-central1"

PIPELINE_ROOT = f"{BUCKET_NAME}/pipeline_root/"

// 파이프라인에서 생성된 아티팩트가 작성될 cloud sotrage 경로

PIPELINE_ROOT
결과 : 파이프라인의 루트 디렉터리가 인쇄 된 것을 확인할 수 있음
3. 첫번째 파이프라인 만들기
* 노트북에 +로 계속 추가
KFP SDK 이용 짧은 파이프라인 생성한다.
작업 2가지 수행
- KFP SDK에서 사용자 지정 구성요소를 만드는 방법
- vertex pipelines에서 파이프라인을 실행하고 모니터링 하는 방법
이걸 가지고 2가지를 출력할 것
- 제품이름
- 이모티콘 설명
이걸 출력하기 위한 구성요소 세가지
- product_name : 제품이름을 입력 → 문자열 출력
- emoji : 이모티콘의 텍스트 설명 → 이모티콘으로 변환
- build_sentence : 이전 두 개의 출력을 사용하여 이모티콘을 사용하는 문장을 만듦
[1단계 : python 함수 기반 구성요소 만들기]
1-1. product_name 문자열 입력 → 해당 문자열을 반환하는 구성요소 빌드
@component(base_image="python:3.9", output_component_file="first-component.yaml")
def product_name(text: str) -> str:
return text- @component : 이 함수를 구성요소로 컴파일, 사용자 정의 구성요소를 작성할 때마다 사용함
- base_image : 구성요소가 사용할 컨테이너 이미지 지정
- output_component_file : 컴파일된 구성요소를 쓸 yaml 파일 지정
1-2. str 함수 이후 출력유형 지정
product_name_component = kfp.components.load_component_from_file('./first-component.yaml')[2단계 : 두 개의 추가 구성 요소 생성]
구성요소 1. 문자열을 입력으로 받아 해당 이모티콘이 있는 경우 이 문자열을 해당 이모티콘으로 변환
@component(packages_to_install=["emoji"])
def emoji(
    text: str,
) -> NamedTuple(
    "Outputs",
    [
        ("emoji_text", str),  # Return parameters
        ("emoji", str),
    ],
):
    import emoji
    emoji_text = text
    emoji_str = emoji.emojize(':' + emoji_text + ':', use_aliases=True)
    print("output one: {}; output_two: {}".format(emoji_text, emoji_str))
return (emoji_text, emoji_str)- packages_to_install : 컨테이너에 대한 외부 라이브러리 종속성을 구성요소에 알려줌
- 이 구성요소는 NamedTuple이라고 불리는 Output을 반환한다.
구성요소 2. 처음 두개의 출력을 사용하고 결합하여 문자열 반환
@component
def build_sentence(
    product: str,
    emoji: str,
    emojitext: str
) -> str:
    print("We completed the pipeline, hooray!")
    end_str = product + " is "
    if len(emoji) > 0:
        end_str += emoji
    else:
        end_str += emojitext
    return(end_str)
여기까지가 파이프라인 정의에서 단계를 생성하는 데 사용할 수 있는 팩토리 함수 생성
[3단계 : 구성요소를 파이프라인에 함께 넣기]
파이프라인 설정하려면
① @dsl.pipeline 데코레이터 사용
② 파이프라인에 이름과 설명 지정
③ 파이프라인의 아티팩트가 작성되어야 하는 루트 경로 제공
* 아티팩트 : 파이프라인에서 생성된 모든 출력 파일
3-1. intro_pipeline 정의
// 초기 파이프라인 단계에 대한 입력과 단계가 서로 연결되는 방식 지정
@dsl.pipeline(
    name="hello-world",
    description="An intro pipeline",
    pipeline_root=PIPELINE_ROOT,
)
# You can change the `text` and `emoji_str` parameters here to update the pipeline output
def intro_pipeline(text: str = "Vertex Pipelines", emoji_str: str = "sparkles"):
    product_task = product_name(text)
    emoji_task = emoji(emoji_str)
    consumer_task = build_sentence(
        product_task.output,
        emoji_task.outputs["emoji"],
        emoji_task.outputs["emoji_text"],
)- product_task : 제품 이름을 입력으로 사용
- emoji_task : 이모티콘의 텍스트 코드를 입력으로 사용
- consumer_task : 입력 매개변수 3가지
- product_task 출력 : 하나의 출력만 생성, product_task.output으로 참조
- emoji_task : emoji단계의 출력, emoji 출력 매개변수의 이름을 지정한 위에서 정의된 구성요소 참조
- emoji_text : emoji의 명명된 출력, 파이프라인에 이모티콘과 일치하지 않는 텍스트가 전달되는 경우, 이 텍스트를 사용하여 문장 구성
[4단계 : 파이프라인 컴파일 실행]
4-1. 파이프라인을 실행하는 json파일 생성
compiler.Compiler().compile(
    pipeline_func=intro_pipeline, package_path="intro_pipeline_job.json"
)
4-2. api 클라이언트 인스턴스화
api_client = AIPlatformClient(
    project_id=PROJECT_ID,
    region=REGION,
)
4-3. 파이프라인 실행
response = api_client.create_run_from_job_spec(
    job_spec_path="intro_pipeline_job.json",
    # pipeline_root=PIPELINE_ROOT  # this argument is necessary if you did not specify PIPELINE_ROOT as part of the pipeline definition.
)
그럼
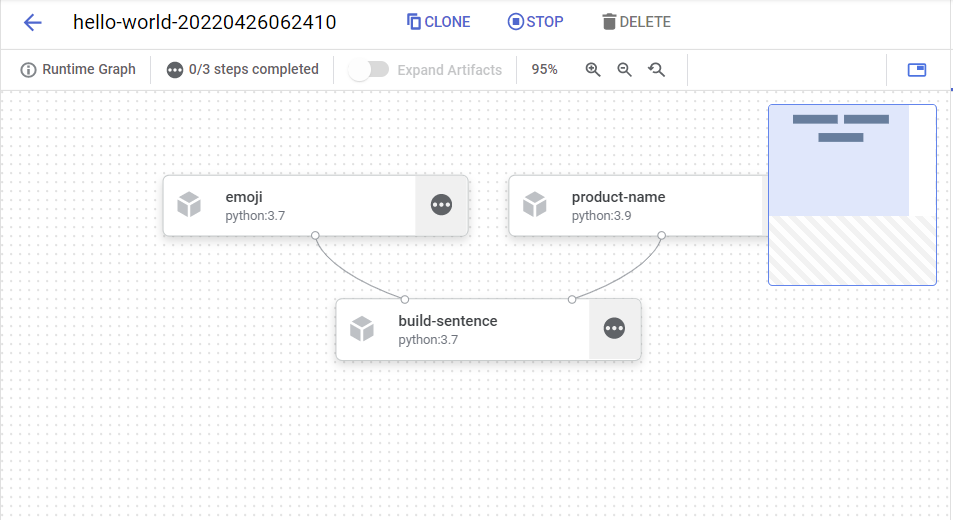
5~6분을 기다리면

완성
하나씩 누르면 오른쪽에 최종 출력을 볼 수 있음
4. 종단 간 ML 파이프라인 만들기(1시간 소요)
[파이프라인이 수행하는 것]
- Vertex AI에서 데이터 세트 생성
- AutoML을 사용하여 표 형식 분류 모델 학습
- 이 모델에 대한 평가 측정항목 가져오기
- 평가 메트릭을 기반으로 Vertex Pipelines에서 조건부 논리를 사용하여 모델을 배포할지 여부를 결정합니다.
- 정점 예측을 사용하여 엔드포인트에 모델 배포
여기서는
1. 하나의 사용자 정의 구성요소 정의
2. 미리 빌드된 구성요소 이용, 나머지 파이프라인 단계를 정의
[1단계 : 모델평가를 위한 사용자 지정 구성요소]
사용자 지정 구성요소 : 모델 교육이 완료되면 파이프라인의 끝 부분에 사용됨
수행작업
- 훈련된 AutoML 분류 모델에서 평가 측정항목 가져오기
- 메트릭을 구문 분석하고 vertex pipeline ui에서 렌더링
- 메트릭을 임계값과 비교하여 모델을 배포해야 하는지 여부 결정
1-1. 사용자 지정 구성요소 만들기
@component(
    base_image="gcr.io/deeplearning-platform-release/tf2-cpu.2-3:latest",
    output_component_file="tables_eval_component.yaml", # Optional: you can use this to load the component later
    packages_to_install=["google-cloud-aiplatform"],
)
def classif_model_eval_metrics(
    project: str,
    location: str,  # "us-central1",
    api_endpoint: str,  # "us-central1-aiplatform.googleapis.com",
    thresholds_dict_str: str,
    model: Input[Model],
    metrics: Output[Metrics],
    metricsc: Output[ClassificationMetrics],
) -> NamedTuple("Outputs", [("dep_decision", str)]):  # Return parameter.
    """This function renders evaluation metrics for an AutoML Tabular classification model.
    It retrieves the classification model evaluation generated by the AutoML Tabular training
    process, does some parsing, and uses that info to render the ROC curve and confusion matrix
    for the model. It also uses given metrics threshold information and compares that to the
    evaluation results to determine whether the model is sufficiently accurate to deploy.
    """
    import json
    import logging
    from google.cloud import aiplatform
    # Fetch model eval info
    def get_eval_info(client, model_name):
        from google.protobuf.json_format import MessageToDict
        response = client.list_model_evaluations(parent=model_name)
        metrics_list = []
        metrics_string_list = []
        for evaluation in response:
            print("model_evaluation")
            print(" name:", evaluation.name)
            print(" metrics_schema_uri:", evaluation.metrics_schema_uri)
            metrics = MessageToDict(evaluation._pb.metrics)
            for metric in metrics.keys():
                logging.info("metric: %s, value: %s", metric, metrics[metric])
            metrics_str = json.dumps(metrics)
            metrics_list.append(metrics)
            metrics_string_list.append(metrics_str)
        return (
            evaluation.name,
            metrics_list,
            metrics_string_list,
        )
    # Use the given metrics threshold(s) to determine whether the model is
    # accurate enough to deploy.
    def classification_thresholds_check(metrics_dict, thresholds_dict):
        for k, v in thresholds_dict.items():
            logging.info("k {}, v {}".format(k, v))
            if k in ["auRoc", "auPrc"]:  # higher is better
                if metrics_dict[k] < v:  # if under threshold, don't deploy
                    logging.info(
                        "{} < {}; returning False".format(metrics_dict[k], v)
                    )
                    return False
        logging.info("threshold checks passed.")
        return True
    def log_metrics(metrics_list, metricsc):
        test_confusion_matrix = metrics_list[0]["confusionMatrix"]
        logging.info("rows: %s", test_confusion_matrix["rows"])
        # log the ROC curve
        fpr = []
        tpr = []
        thresholds = []
        for item in metrics_list[0]["confidenceMetrics"]:
            fpr.append(item.get("falsePositiveRate", 0.0))
            tpr.append(item.get("recall", 0.0))
            thresholds.append(item.get("confidenceThreshold", 0.0))
        print(f"fpr: {fpr}")
        print(f"tpr: {tpr}")
        print(f"thresholds: {thresholds}")
        metricsc.log_roc_curve(fpr, tpr, thresholds)
        # log the confusion matrix
        annotations = []
        for item in test_confusion_matrix["annotationSpecs"]:
            annotations.append(item["displayName"])
        logging.info("confusion matrix annotations: %s", annotations)
        metricsc.log_confusion_matrix(
            annotations,
            test_confusion_matrix["rows"],
        )
        # log textual metrics info as well
        for metric in metrics_list[0].keys():
            if metric != "confidenceMetrics":
                val_string = json.dumps(metrics_list[0][metric])
                metrics.log_metric(metric, val_string)
        # metrics.metadata["model_type"] = "AutoML Tabular classification"
    logging.getLogger().setLevel(logging.INFO)
    aiplatform.init(project=project)
    # extract the model resource name from the input Model Artifact
    model_resource_path = model.uri.replace("aiplatform://v1/", "")
    logging.info("model path: %s", model_resource_path)
    client_options = {"api_endpoint": api_endpoint}
    # Initialize client that will be used to create and send requests.
    client = aiplatform.gapic.ModelServiceClient(client_options=client_options)
    eval_name, metrics_list, metrics_str_list = get_eval_info(
        client, model_resource_path
    )
    logging.info("got evaluation name: %s", eval_name)
    logging.info("got metrics list: %s", metrics_list)
    log_metrics(metrics_list, metricsc)
    thresholds_dict = json.loads(thresholds_dict_str)
    deploy = classification_thresholds_check(metrics_list[0], thresholds_dict)
    if deploy:
        dep_decision = "true"
    else:
        dep_decision = "false"
    logging.info("deployment decision is %s", dep_decision)
    return (dep_decision,)
[2단계 : google cloud 사전빌드 구성요소 추가]
나머지 파이프라인 구성요소 정의, 구성요소가 어떻게 맞는지 확인
2-1. 타임스탬프 이용 파이프라인 실행의 표시 이름 정의
import time
DISPLAY_NAME = 'automl-beans{}'.format(str(int(time.time())))
print(DISPLAY_NAME)
2-2. 파이프라인이 사용하는 입력 매개변수 정의 & vertex ai 서비스와 상호작용 하기 위해 구성요소 사용
@kfp.dsl.pipeline(name="automl-tab-beans-training-v2",
                  pipeline_root=PIPELINE_ROOT)
def pipeline(
    bq_source: str = "bq://aju-dev-demos.beans.beans1",
    display_name: str = DISPLAY_NAME,
    project: str = PROJECT_ID,
    gcp_region: str = "us-central1",
    api_endpoint: str = "us-central1-aiplatform.googleapis.com",
    thresholds_dict_str: str = '{"auRoc": 0.95}',
):
    dataset_create_op = gcc_aip.TabularDatasetCreateOp(
        project=project, display_name=display_name, bq_source=bq_source
    )
    training_op = gcc_aip.AutoMLTabularTrainingJobRunOp(
        project=project,
        display_name=display_name,
        optimization_prediction_type="classification",
        budget_milli_node_hours=1000,
        column_transformations=[
            {"numeric": {"column_name": "Area"}},
            {"numeric": {"column_name": "Perimeter"}},
            {"numeric": {"column_name": "MajorAxisLength"}},
            {"numeric": {"column_name": "MinorAxisLength"}},
            {"numeric": {"column_name": "AspectRation"}},
            {"numeric": {"column_name": "Eccentricity"}},
            {"numeric": {"column_name": "ConvexArea"}},
            {"numeric": {"column_name": "EquivDiameter"}},
            {"numeric": {"column_name": "Extent"}},
            {"numeric": {"column_name": "Solidity"}},
            {"numeric": {"column_name": "roundness"}},
            {"numeric": {"column_name": "Compactness"}},
            {"numeric": {"column_name": "ShapeFactor1"}},
            {"numeric": {"column_name": "ShapeFactor2"}},
            {"numeric": {"column_name": "ShapeFactor3"}},
            {"numeric": {"column_name": "ShapeFactor4"}},
            {"categorical": {"column_name": "Class"}},
        ],
        dataset=dataset_create_op.outputs["dataset"],
        target_column="Class",
    )
    model_eval_task = classif_model_eval_metrics(
        project,
        gcp_region,
        api_endpoint,
        thresholds_dict_str,
        training_op.outputs["model"],
    )
    with dsl.Condition(
        model_eval_task.outputs["dep_decision"] == "true",
        name="deploy_decision",
    ):
        deploy_op = gcc_aip.ModelDeployOp(  # noqa: F841
            model=training_op.outputs["model"],
            project=project,
            machine_type="n1-standard-4",
        )
이 코드에서 일어나는 일
- 입력 매개변수 정의
- 몇가지 구성요소 사용
- TabularDatasetCreateOpCloud Storage 또는 BigQuery의 데이터 세트 소스가 제공된 Vertex AI에 테이블 형식 데이터 세트를 생성, 이 파이프라인에서는 BigQuery 테이블 URL을 통해 데이터를 전달합니다.
- AutoMLTabularTrainingJobRunOp테이블 형식 데이터 세트에 대한 AutoML 학습 작업을 시작합니다. 모델 유형(이 경우 분류), 열의 일부 데이터, 훈련을 실행할 기간 및 데이터 세트에 대한 포인터를 포함하여 이 구성 요소에 몇 가지 구성 매개변수를 전달합니다. 이 구성 요소에 데이터 세트를 전달하려면 를 통해 이전 구성 요소의 출력을 제공해야 합니다. dataset_create_op.outputs["dataset"].
- ModelDeployOpVertex AI의 엔드포인트에 주어진 모델을 배포합니다. 사용 가능한 추가 구성 옵션이 있지만 여기에서는 배포하려는 엔드포인트 머신 유형, 프로젝트 및 모델을 제공합니다. 파이프라인에서 학습 단계의 출력에 액세스하여 모델을 전달합니다.
- 조건부 논리 사용
* vertex pipelines의 기능 중 하나
[3단계 : 종단 간 ML 파이프라인 컴파일 및 실행]
3-1. 전체 파이프라인 정의 후 컴파일
compiler.Compiler().compile(
    pipeline_func=pipeline, package_path="tab_classif_pipeline.json"
)
3-2. 파이프라인 실행
response = api_client.create_run_from_job_spec(
    "tab_classif_pipeline.json", pipeline_root=PIPELINE_ROOT,
    parameter_values={"project": PROJECT_ID,
                      "display_name": DISPLAY_NAME}
)
실행 후 표시된 링크를 누르면

시간이 좀 지나면 체크포인트에 자동으로 체크가 되지만

여기서 더이상 움직이지 않음
autoML은 생각보다 소비되는 시간이 길어서 얘는 완성은 되지 않는다.
퀵랩에는 완성된 파이프라인이 나와있음
[4단계 : 파이프라인 실행 간의 메트릭 비교]
메소드를 사용하여 aiplatform.get_pipeline_df()실행 메타데이터에 액세스
pipeline_df = aiplatform.get_pipeline_df(pipeline="automl-tab-beans-training-v2")
small_pipeline_df = pipeline_df.head(2)
small_pipeline_df

'GCP > Qwiklabs' 카테고리의 다른 글
| Building an IoT Analytics Pipeline on Google Cloud (0) | 2022.05.02 |
|---|---|
| Building and Deploying Machine Learning Solutions with Vertex AI: Challenge Lab (0) | 2022.04.28 |
| Deploy a BigQuery ML Customer Churn Classifier to Vertex AI for Online Predictions (0) | 2022.04.26 |
| 220425_Identify Damaged Car Parts with Vertex AutoML Vision (0) | 2022.04.25 |
| Vertex AI: Qwik Start (0) | 2022.04.25 |


