
JINIers
Building and Deploying Machine Learning Solutions with Vertex AI: Challenge Lab 본문
Building and Deploying Machine Learning Solutions with Vertex AI: Challenge Lab
JINIers 2022. 4. 28. 16:43220427_vertex AI로 머신러닝 솔루션 구축 및 배포
테스트한 주제
1. 호스팅된 vertex 노트북에서 로컬로 tensorflow 모델을 훈련시킴
2. cloud build로 학습 코드를 컨테이너화하고 vertex 커스텀 컨테이너 학습 워크플로의 일부로 google cloud artifact registry에 푸시
3. 예측을 제공하기 위해 핛급된 모델을 vertex on line prediction endpoint에 배포
4. 온라인 예측 요청 및 응답확인
와 근데 이거 진짜 좀 어려워.. 5번 시도했는데 5번 다 실패했다.
퀵랩은 4~5번정도 하면 더이상 할 수 없다고 실습이 잠겨버리는데 그럴땐 문의를 해서 풀어달라고 요청하면된다.
내가 최대로 했을 때가 80점이었음 흑흑
도전 시나리오
제한된 데이터로 고성능 기계 학습 모델을 신속하게 구축 및 배포하기 위해 google cloud의 vertex ai 플랫폼에서 온라인 예측을 위한 맞춤형 tensorflow BERT 감정 분류기를 학습하고 배포하는 과정을 안내함

* BERT란?
Bidirectional Encoder Representations from Transformers
구글 인공지능 언어모델
1. vertex notebooks 인스턴스 생성
vertex ai > workbench > create notebook >
name : vertex-ai-challenge
version : TensorFlow Enterprise 2.6
2. 챌린지 노트북 다운로드
vertex-ai-challenge > open jupyter > terminal

[리포지토리 복제]
git clone https://github.com/GoogleCloudPlatform/training-data-analyst
[패키지 설치]
cd training-data-analyst/quests/vertex-ai/vertex-challenge-lab
pip install -U -r requirements.txt
training-data-analyst/quests/vertex-ai/vertex-challenge-lab 폴더로 이동 > vertex-challenge-lab.ipynb 파일 열기
[데이터 세트 가져오기(PROJECT_ID및 GCS_BUCKET변수 USER를 정의)]
#2
PROJECT_ID = !(gcloud config get-value core/project)
PROJECT_ID = PROJECT_ID [0]

#3
GCS_BUCKET = f"gs://{PROJECT_ID}-vertex-ai-challenge-lab"

3. vertex notebook 에서 로컬로 모델 빌드 및 학습
[tensorFlow BERT 감정 분류기 빌드 및 컴파일]
3.1. BERT 텍스트 전처리를 위해 추가할 섹션을 작성 하십시오.hub.KerasLayer
#18
preprocessor = hub.KerasLayer(hparams['tfhub-bert-preprocessor'], name='preprocessing')
3.2. BERT 텍스트 인코딩을 위해 추가할 섹션을 작성 하십시오.(hub.KerasLayer)
#18
encoder = hub.KerasLayer(hparams['tfhub-bert-encoder'], trainable=True, name='BERT_encoder')

3.3. 섹션을 작성하여 BERT 감정 분류기를 로컬에 저장(./bert-sentiment-classifier-local디렉토리에 저장)
#23
"model-dir" : "./bert-sentiment-classifier-local"

4. cloud build를 사용하여 모델 컨테이터를 빌드하고 google cloud artifact registry에 제출
[섹션을 작성하여 gcloud CLI를 사용하여 Docker Artifact Registry 생성]
#33
!gcloud artifacts repositories create {ARTIFACT_REGISTRY} \
--repository-format=docker \
--location={REGION} \
--description="Artifact registry for ML custom training images for sentiment classification"

[cloud build를 사용하여 컨테이너 이미지를 빌드하고 artifact registry에 제출]
# ??
!gcloud builds submit {MODEL_DIR} --timeout=20m --config {MODEL_DIR}/cloudbuild.yaml

#39
USER = "qwiklabdemo"

#41
display_name=display_name,
container_uri=container_uri,
model_serving_container_image_uri=model_serving_container_image_uri,
base_output_dir=base_output_dir

5. KFP SDK를 사용하여 파이프라인 정리
[위의 셀에 정의된 구성요소를 추가 및 구성하는 섹션 작업]
#49
endpoint_name=ENDPOINT_NAME,
project=PROJECT_ID,
location=REGION
#50
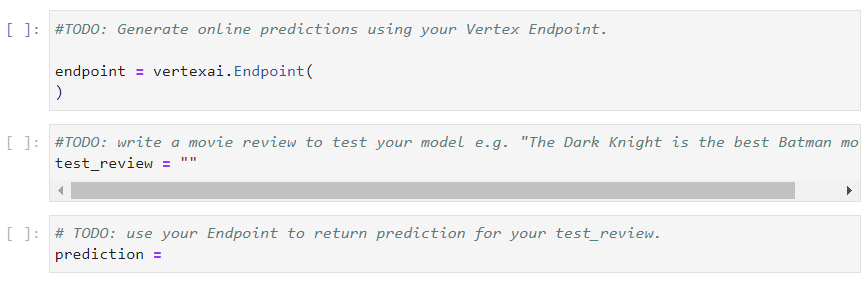
test_review = "The Dark Knight is the best Batman movie!"
#51
prediction = endpoint.predict([test_review])

6. 온라인 예측을 위해 vertex endpoint에 배포된 모델 쿼리
'GCP > Qwiklabs' 카테고리의 다른 글
| Building and Deploying Machine Learning Solutions with Vertex AI: Challenge Lab (0) | 2022.05.04 |
|---|---|
| Building an IoT Analytics Pipeline on Google Cloud (0) | 2022.05.02 |
| Vertex Pipelines: Qwik Start (0) | 2022.04.27 |
| Deploy a BigQuery ML Customer Churn Classifier to Vertex AI for Online Predictions (0) | 2022.04.26 |
| 220425_Identify Damaged Car Parts with Vertex AutoML Vision (0) | 2022.04.25 |


